

Simple pipelining in Jenkins CI

This is my first post about Jenkins CI. I’d played for days with Jenkins CI pipeline in order to complete my personal project, and I would like to take some notes for it.
If you are looking for using Jenkins along with Docker, you could read Deploy docker image with Jenkins
Materials
Jenkins CI
2.xPipeline plugins are installed
Vagrant
VirtualBox
In order to make life easier, I provide a vagrant box for this post, hence, please open a folder and create a Vagrantfile with below content
If you have no ideas about Vagrant, please read about it first
# -*- mode: ruby -*-
# vi: set ft=ruby :

Vagrant.configure("2") do |config|
  config.vm.box = "dotronglong/jenkins-php"
  config.vm.network "private_network", ip: "192.168.33.99"
  config.vm.provider "virtualbox" do |vb|
    vb.memory = "2048"
    vb.cpus = 2
  end
end
You could adjust machine’s information, e.g, cpus, memory to match your current host.
Now time to kick it off
vagrant upIt will start bringing up machine, it’s time for a cup of coffee
Pipeline
Before going through a demo, let’s spend a little bit time to understand about Pipeline in Jenkins CI.
Jenkins Pipeline (or simply “Pipeline” with a capital “P”) is a suite of plugins which supports implementing and integrating continuous delivery pipelines into Jenkins.
(Source: Jenkins)
In order to work with pipeline, you need to know some basic concepts:
pipeline: define a pipelinestages: define a number of stagesstage: contains definitions about agent, steps, e.g,test,deployagent: specifies which jenkins's node to be usedsteps: contains a number of stepsstep: is either a command or a plugin, script
General speaking, it could illustrate as below:pipeline -> stages -> stage -> steps -> agent, step
If you are searching around and seeing definition about node, I suggest that we should ignore it for now, so as not to lead into confusions
Practice
You could see following result when machine is starting.
Bringing machine 'default' up with 'virtualbox' provider...
==> default: Importing base box 'dotronglong/jenkins-docker'...
==> default: Matching MAC address for NAT networking...
==> default: Checking if box 'dotronglong/jenkins-docker' is up to date...
==> default: Setting the name of the VM: jenkins_default_1509113257702_22526
==> default: Clearing any previously set network interfaces...
==> default: Preparing network interfaces based on configuration...
    default: Adapter 1: nat
    default: Adapter 2: hostonly
==> default: Forwarding ports...
    default: 22 (guest) => 2222 (host) (adapter 1)
==> default: Running 'pre-boot' VM customizations...
==> default: Booting VM...
==> default: Waiting for machine to boot. This may take a few minutes...
    default: SSH address: 127.0.0.1:2222
    default: SSH username: vagrant
    default: SSH auth method: private key
==> default: Machine booted and ready!
[default] GuestAdditions 5.1.30 running --- OK.
==> default: Checking for guest additions in VM...
==> default: Configuring and enabling network interfaces...
    default: SSH address: 127.0.0.1:2222
    default: SSH username: vagrant
    default: SSH auth method: private key
==> default: Mounting shared folders...
    default: /vagrant => /Users/long.dotrong/Works/vagrant/jenkins
In case you got error message about Vagrant was unable to mount VirtualBox shared folders, you have to install vagrant-vbguest plugin, or you could ignore it if you don't need to mount any files to your box
vagrant plugin install vagrant-vbguestAfter machine finishes start up, please access to url http://192.168.33.99 with login user admin and password 123456. You would see Jenkins page.
In this post, I will create a simple pipeline to do some jobs:
Clone a repository
Resolve dependencies
Run unit tests
Jenkins’ Actions
Create a jenkin’s job using pipeline type
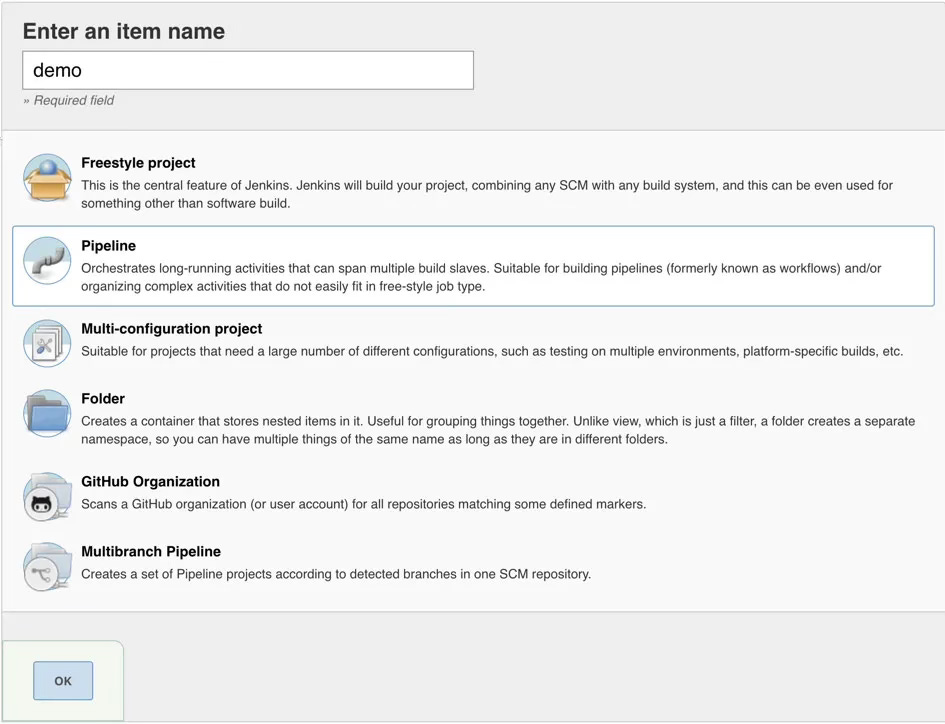
Under pipeline definition section, use below script:
pipeline {
agent none
stages {
stage('CheckOut') {
agent { label 'master' }
steps {
checkout([$class: 'GitSCM', branches: [[name: '*/master']], doGenerateSubmoduleConfigurations: false, extensions: [], submoduleCfg: [], userRemoteConfigs: [[url: 'https://github.com/dotronglong/titan-event.git']]])
}
}
stage('Prepare') {
agent { label 'master' }
steps {
sh 'curl -SLO https://getcomposer.org/composer.phar'
sh 'chmod +x composer.phar'
sh 'mv composer.phar composer'
}
}
stage('ResolveDependencies') {
agent { label 'master' }
steps {
sh './composer install --ansi --no-interaction --optimize-autoloader'
}
}
stage('TestUnit') {
agent { label 'master' }
steps {
sh './vendor/bin/phpunit'
}
post {
always {
deleteDir()
}
}
}
}
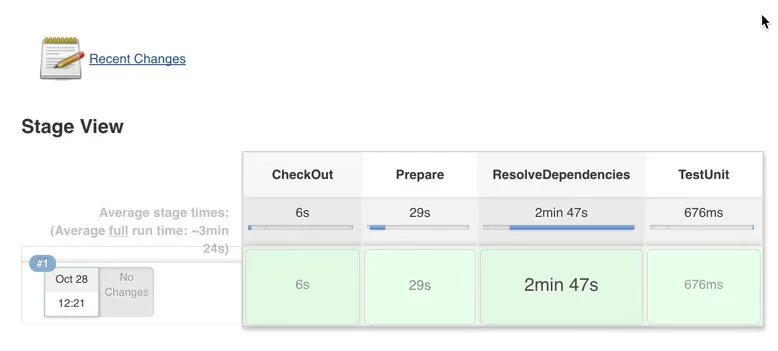
}Next, run build to start job’s build, after job finished, graphical result should be
Explanation
First, we define a pipeline, and notify jenkins that we do not need to specify any agent, as we are going to use appropriate agent in each stages
pipeline {
    agent none
}
Next, we define a list of stages by using stages {} block
stages {
}
As per described ealier, we plan to do 3 tasks (or stages), and they are CheckOut, ResolveDependencies, and TestUnit. That is reason for each below blocks
stage('CheckOut') {
    agent { label 'master' }
    steps {
        checkout([$class: 'GitSCM', branches: [[name: '*/master']], doGenerateSubmoduleConfigurations: false, extensions: [], submoduleCfg: [], userRemoteConfigs: [[url: 'https://github.com/dotronglong/titan-event.git']]])
    }
}
To checkout source from a proposed repository
Since we need composer to resolve dependencies then it needs to be downloaded before starting
stage('Prepare') {
    agent { label 'master' }
    steps {
        sh 'curl -SLO https://getcomposer.org/composer.phar'
        sh 'chmod +x composer.phar'
        sh 'mv composer.phar composer'
    }
}
When composer is ready, we will start to resolve project's dependencies
stage('ResolveDependencies') {
    agent { label 'master' }
    steps {
        sh './composer install --ansi --no-interaction --optimize-autoloader'
    }
}
Finally, we run unit testing, however, we also need to delete workspace in order to make a clean environment for later build
stage('TestUnit') {
    agent { label 'master' }
    steps {
        sh './vendor/bin/phpunit'
    }
    post {
        always {
            deleteDir()
        }
    }
}
Tips
Use
shto execute a command line scriptIn order to run multiple lines script, you could use as below
sh '''
    // your multiple lines script here
'''postperforms a sequence of actions after astage,pipelinefinished. There are multiple choices for it:always: Run regardless of the completion status of the Pipeline runchanged: Only run if the current Pipeline run has a different status from the previously completed Pipeline.failure: Only run if the current Pipeline has a "failed" status, typically denoted in the web UI with a red indication.success: Only run if the current Pipeline has a "success" status, typically denoted in the web UI with a blue or green indication.unstable: Only run if the current Pipeline has an "unstable" status, usually caused by test failures, code violations, etc. Typically denoted in the web UI with a yellow indication.aborted: Only run if the current Pipeline has an "aborted" status, usually due to the Pipeline being manually aborted. Typically denoted in the web UI with a gray indication.
Conclusion
Pipeline could help your result look better while you could easily get idea about which build’s stage is failed
Pipeline syntax might get you confused at some times, however, it’s declarative syntax allows us make work faster
More information could be seen at Jenkins Documentation